
DIY Aquarium Backround First Attempt.
5 posters


DIY Aquarium Backround First Attempt.
![]() by coolestmysterysnail Sat Aug 08, 2015 4:45 pm
by coolestmysterysnail Sat Aug 08, 2015 4:45 pm
Hey guys
New to aquariums, and newer to this forum. Currently have a 30g and 10g set up. For my 30 i really wanted to get a background so the cords would be less visible, and to add to the feel of the aquarium. So from what I found online and in stores i wasn't pleased with the selection. They were either too expensive, or took up to much real-estate in the tank(or both). So that led me to DIY background. But since i don't want a permanent background, and since my tank is already established and don't want to do a tear down, I have to be a little creative.
So here's the plan, please feel free to give your two cents to help me make this as safe as possible for my tanks inhabitants.
I going to make a "ledge stone" look background from 3/8" thick Porcelain tile siliconed to a 1/4" acrylic sheet. Total thickness would be approx 5/8" and should still fit behind my HOB filter.
The tiles are glazed on top (food safe). I plan to seal all the edges with silicone to prevent any colouring from the tiles leaching into the tank. I'm going to do it in two pieces so it can be installed in an established tank, and I'm going to attach suction cups to the back so that it can be removed for cleaning, or if i get sick of it.
Does anyone have any advise, or have gone through anything similar and can share tips.
Also, should I seal the entire front of the finished product with a clear coat epoxy or spray?
Will be starting the project monday and will post pics of it when done.
2015-08-08
30 Gallon tank,1 Black Mystery Snail, 2 Tux Platy, 6 Harlequin Rasbora, some Ghost Shrimp.
10 Gallon (new) - 3 Dalmatian Platy, 3 RCS
Adding more each month
coolestmysterysnail- Shrimp

- Posts : 49
Join date : 2015-07-27
Location : Ottawa ON
Re: DIY Aquarium Backround First Attempt.
![]() by CAAIndie Sat Aug 08, 2015 7:46 pm
by CAAIndie Sat Aug 08, 2015 7:46 pm
I haven't done any 3d backgrounds on my tank, I have always just done simple things to hides the cords (I have a black background). I have no doubt that a well executed one would looks fantastic though. You'll have to keep us updated. I'm sure we have a few members that have played around with something similar.
CAAIndie- Admin

- Posts : 2908
Join date : 2013-09-06 -

Re: DIY Aquarium Backround First Attempt.
![]() by JanesAddiction Sun Aug 09, 2015 4:21 pm
by JanesAddiction Sun Aug 09, 2015 4:21 pm
I haven't done any DIY backgrounds but...I LOVE DIY ideas!!! I would love to see pics as you do it!!! I would recommend Marineland Aquarium Sealant as it is clearly the safest! I do find when using it on something in the tank (not the seals) that it does wear down over a few months...I hope this turns out as well as it sounds it will!
JanesAddiction- Pleco Poster

- Posts : 981
Join date : 2015-02-04
Location : New Brunswick, Canada
Re: DIY Aquarium Backround First Attempt.
![]() by coolestmysterysnail Fri Aug 28, 2015 5:23 am
by coolestmysterysnail Fri Aug 28, 2015 5:23 am
So I finally got the tiles back cut to size. I didnt get a chance to do a step by step pics set but ill go over what ive done so war.
out the patern you want to go with and measure and cut tiles and acrylic backing dry lay tiles to get visual to your liking.
Do a full peremiter in silicone on back of tiles, and a zig zag pattern on back to ensure good bonding. Attach a full row to the top of your background 1 tile at a time and press firmly down.wipe excess silicone from premiter and use to fill spaces between tiles. Let dry for 20-30 minutes. This will give it a good enough hold to push the next rows tightly against(not to tight).
Do one fair sized bead along the bottom of first row. Repeat the silicone to back of tile step and press up against the first row so that silicone is pressed between rows.
Repeat untill your backing is full.
Remember to press firmly down and hold for a few seconds. Wipe silicone that comes out and wipe between all tiles spaces.
When your done it should look something like this
coolestmysterysnail- Shrimp
- Posts : 49
Join date : 2015-07-27
Location : Ottawa ON
Re: DIY Aquarium Backround First Attempt.
![]() by coolestmysterysnail Fri Aug 28, 2015 5:25 am
by coolestmysterysnail Fri Aug 28, 2015 5:25 am
[img] [/img]
[/img]
coolestmysterysnail- Shrimp
- Posts : 49
Join date : 2015-07-27
Location : Ottawa ON
Re: DIY Aquarium Backround First Attempt.
![]() by JanesAddiction Fri Aug 28, 2015 11:13 am
by JanesAddiction Fri Aug 28, 2015 11:13 am
I like this  Can't wait to see it completed
JanesAddiction- Pleco Poster
- Posts : 981
Join date : 2015-02-04
Location : New Brunswick, Canada
Re: DIY Aquarium Backround First Attempt.
![]() by CAAIndie Fri Aug 28, 2015 10:15 pm
by CAAIndie Fri Aug 28, 2015 10:15 pm
This is looking good. Are you pleased with how it's going?
Should be an interesting background for sure. I'd love to see it completed and in the tank.
Should be an interesting background for sure. I'd love to see it completed and in the tank.
CAAIndie- Admin
- Posts : 2908
Join date : 2013-09-06 -
Re: DIY Aquarium Backround First Attempt.
![]() by coolestmysterysnail Sat Aug 29, 2015 12:30 pm
by coolestmysterysnail Sat Aug 29, 2015 12:30 pm
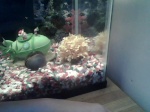
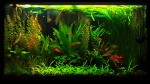
So finally done. Ran into a couple snags. First of all decided not to go with two part backround as i likes the brick pattern when i dry laid the tile. This made it hard to install in established tank, cause the fish wanted to stay behind the background. Second issue was my friend who cut the tiles made a mistake and cut two of the tiles too wide, so the height was off by literally millimeters.....
So removed the thin row from the bottom. In first pic.
Anyway heres the completed background installed.
Please let me know what you think.
So removed the thin row from the bottom. In first pic.
Anyway heres the completed background installed.
Please let me know what you think.
coolestmysterysnail- Shrimp
- Posts : 49
Join date : 2015-07-27
Location : Ottawa ON

coolestmysterysnail- Shrimp
- Posts : 49
Join date : 2015-07-27
Location : Ottawa ON
JanesAddiction- Pleco Poster
- Posts : 981
Join date : 2015-02-04
Location : New Brunswick, Canada
FishHobby- Angel Fish

- Posts : 162
Join date : 2015-07-20
Location : Barrie, ON
Re: DIY Aquarium Backround First Attempt.
![]() by Biulu Tue Sep 01, 2015 9:19 pm
by Biulu Tue Sep 01, 2015 9:19 pm
this looks ace! How did you attach it to the back of your tank? I am asking because I heard that people using suction cups lost a few fish because they got stuck behind them....

Biulu- Support
- Posts : 3694
Join date : 2013-09-12
Location : Montreal, Quebec
Re: DIY Aquarium Backround First Attempt.
![]() by coolestmysterysnail Wed Sep 02, 2015 5:15 am
by coolestmysterysnail Wed Sep 02, 2015 5:15 am
Thanks for the good feedback all.
Actually the original idea was to attach double sided siction cups to the back, but works pretty awesome without anything. Its flush against the back with the gravel and hob filter intake holding it in place. I installed it on an angle and put my hand on one side and slowly moved it to the right where there was still a place to escape, then when I was about 2 inches from the back, checked to make sure there was no fish and put it in place. I of course counted the fish to make sure none were gone.
Funniest thing was my male Krib was nowhere to be found, but I couldn't find him behind the background. Since I had moved a bunch of gravel and decorations I started freaking out that I had buried him or squashed him under a rock...... nope, just turns out he's REALLY good at hide and seek. He turned up later that day right as rain.
coolestmysterysnail- Shrimp
- Posts : 49
Join date : 2015-07-27
Location : Ottawa ON
Re: DIY Aquarium Backround First Attempt.
![]() by JanesAddiction Thu Sep 03, 2015 5:05 am
by JanesAddiction Thu Sep 03, 2015 5:05 am
I absolutely love the look of this! Your Krib...lol...Mine does the same to me sometimes! lol
JanesAddiction- Pleco Poster
- Posts : 981
Join date : 2015-02-04
Location : New Brunswick, Canada
» My cycling story or attempt with Dr Tims one and only
» Build your own aquarium
» I am looking to buy an aquarium for Christmas ...
» Aquarium Resolutions
» Can I use tapwater in my Aquarium ?
» Build your own aquarium
» I am looking to buy an aquarium for Christmas ...
» Aquarium Resolutions
» Can I use tapwater in my Aquarium ?
Permissions in this forum:
You can reply to topics in this forum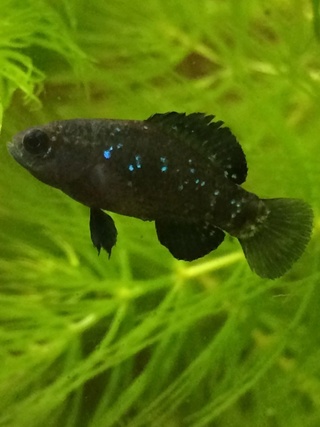 Alexmtl

» Anyone still around? Need help transporting fish
» Stocking suggestions
» New Tank Purchase
» 3 Gallon Tetra half moon tank
» White floaty stuff in gold fish tank
» Ammonia in tap water
» Need advice for beginner with fresh water tank
» Fluval FX5 hose size?
» smart fish, dumb fish, pink fish...um, what rhymes with dumb?
» Is K&E sandblasting sand same as Black diamond?
» What the...is that a leak? NOOOOOOOOOOO!!!!! (a comedy of horrors...)
» Air stones and the noise they make
» aquatic medications
» film like stuff on the water surface of shark tank
» Articles on swordtail behaviour and fathead minnows
» Lets see your predators!
» Humane way to PTS a shark
» My tanks (Introducing myself)
» Build your own aquarium